v1.1.0 · macOS 13+
Speak. It types.
Local speech-to-text for macOS. Press a key, speak, text appears at the cursor. No cloud, no subscription, no latency.
Local speech-to-text for macOS. Press a key, speak, text appears at the cursor. No cloud, no subscription, no latency.
Install the app, press your hotkey, and start talking. KeySpeak handles the rest. See the full setup guide below.
No accounts, no internet, no monthly fees. Just fast, private voice typing.
A dark, minimal settings panel that opens below your menu bar. Configure your hotkey, language, and word corrections.
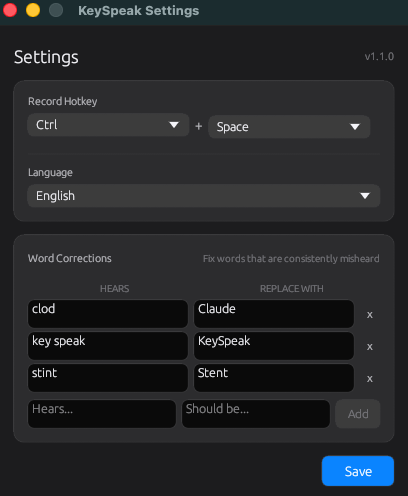
KeySpeak settings window with dark macOS-native UI
Audio is transcribed locally using a 500MB Whisper model. Nothing is uploaded anywhere.
Zero telemetry, no crash reports, no usage tracking. We have no servers to send data to.
No sign-up, no login, no email required. Download, install, use.
Or build from source for free (MIT License)
Everything you need from install to first transcription. No configuration required.
Open the DMG file and drag KeySpeak.app into your Applications folder.
On first launch, macOS will ask for Microphone access (to record your voice) and Accessibility access (to type text into other apps). Grant both in System Settings.
Press Option+Space in any app. The menu bar icon turns red while recording. Speak naturally, then press the hotkey again to stop. Your transcribed text is typed at the cursor.
Press Enter during recording to mark a line break. KeySpeak splits the audio at each Enter press and inserts newlines between paragraphs in the final transcription.
Press Ctrl+Option+Shift+, or click the menu bar icon and choose Settings. From here you can change your hotkey, choose a language, and add word corrections for names and jargon Whisper gets wrong.
The menu bar icon changes colour to show what KeySpeak is doing: grey when idle, red while recording, and blue while transcribing. Press Ctrl+Option+Shift+Q to quit.
Delete the old KeySpeak.app from Applications, then install the new DMG. After installing, go to System Settings > Privacy & Security > Accessibility, remove the old KeySpeak entry, click + to re-add the new one, and toggle it on. This is required because macOS caches permissions per binary signature.
Make sure KeySpeak has Accessibility access in System Settings > Privacy & Security > Accessibility. If you recently updated, remove the old entry and re-add the new KeySpeak.app. Also check that your chosen hotkey doesn't conflict with macOS shortcuts (Ctrl+Space is used by Spotlight/input sources).
The icon turns red then blue, but nothing is typed. This means transcription works but the app can't inject keystrokes. Go to System Settings > Privacy & Security > Accessibility, remove KeySpeak, re-add it, and make sure the toggle is on. Restart KeySpeak after.
On first launch, macOS blocks unsigned apps. Go to System Settings > Privacy & Security, scroll down and click Open Anyway next to the KeySpeak message. You only need to do this once.
Make sure Microphone access is granted in System Settings > Privacy & Security > Microphone. If transcription returns silence hallucinations like "thank you" or "bye", speak louder or closer to the mic - KeySpeak filters these automatically but very quiet audio can confuse the model.
Your settings are preserved across updates at ~/Library/Application Support/keyspeak/settings.json. Only the Accessibility permission needs to be re-granted after installing a new version.
KeySpeak writes a log file to ~/Library/Application Support/keyspeak/keyspeak.log. If you're stuck, check the log and open an issue on GitHub with the contents.